google drive
|
Google Drive is where all of your documents are stored. Google can store virtually any kind of file for you. You can store your pictures, music files, PDFs and even Microsoft and Apple files in Drive. You also start/create new documents, spreadsheets, presentations, forms, etc. in Google Drive. Drive is not only your storage area but your launching pad for many other Google Apps.
Watch this introductory video on Google Drive: |
|
first, lets get logged into Google
First and foremost you need to know. . . . . .you MUST be working in the Google Chrome browser in order to be working in GAFE. Many features of GAFE do not work properly in Internet Explorer, Firefox, or Safari.
Follow the instruction below to log into Google and to get to your Google Drive
Follow the instruction below to log into Google and to get to your Google Drive
Creating folders and sharing folder in Google Drive
Take a look at the instructions below for how to create folders in your Google Drive and share folders!
tutorial task for google drive
Navigate to your Google Drive and create at least two folders
STEP ONE: To create a folder, click “Create” and then choose “Folder.” Remember that you can customize the colors.
STEP TWO: Either create a Google Doc in that folder OR upload an exsisting MS Word document on your computer to that folder.
STEP THREE: Share your folder with your partner in the room.
STEP FOUR: Find the folder shared with you and upload a document to that folder OR start a new Google Doc in that folder.
a couple of other useful google drive tools
Here are a couple of other useful tools teachers asked about in trainings regarding Google Drive.
Viewing your drive in icons rather than list form
|
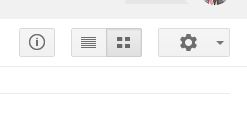
This is simple. All you have to do is click on the button in the upper right hand corner when you are in your drive.
The icon that looks like lines will display your Drive as a list. The icon that looks like 4 squares will display them as icons. |
|
creating a public folder to share with your students
A popular thing to do in drive is to create a folder which you can share with your students. Think of it as your public folder in the cloud that students can access anytime anywhere. File you add can be seen by your students but they cannot alter them unless they make a copy to save to their drive.
|
STEP ONE: Create a folder. From inside of the folder click on the shared button in the upper right hand corner. (It looks like a person with a "+" sign.
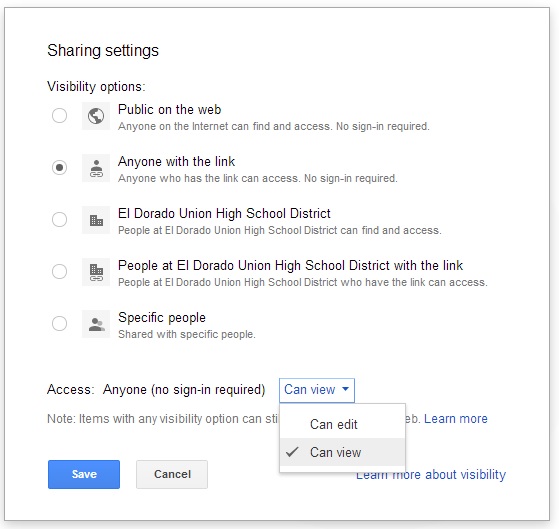
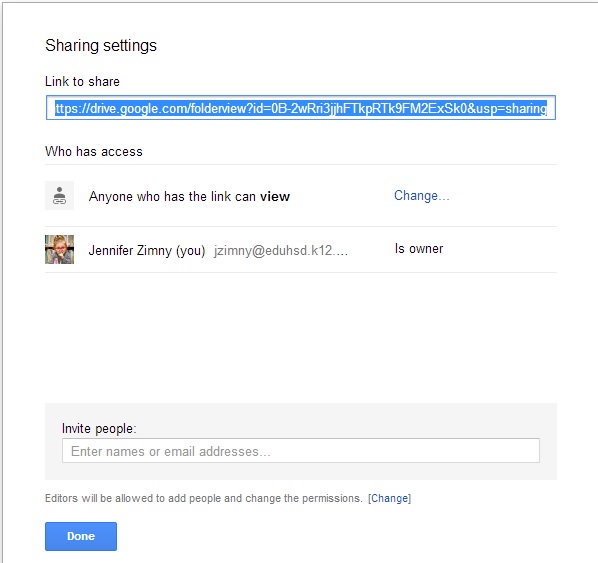
STEP TWO: From in this new menu that pops up, first click "Advanced" down in the lower right hand corner. Then there is a section that says "Who has access." It will automatically say "Private--Only you can access." On the side of that, it says "Change." Click that. STEP THREE: A new menu will pop up that looks like the picture on the right (upper). (Click on the picture for a better view.) Make sure to select "Anyone with the link" and then make sure under "Access" you have selected "Can view." This way, students will be able to view the files but not edit or delete the files. Click "Save." STEP FOUR: Put a link to the folder on your website. You will find the link to your folder at the top of your "Sharing settings." Please see the lower picture on the right. STEP FIVE: When your students click on your link to your folder, there will be a button in the upper right hand corner that will say "Save to Drive." They will click that. Then the button will change and say "Open in Drive." Click that again. Now the folder will be saved to their Google Drive. (They will only have to do this step once.) STEP SIX: For any documents they want to edit that you have in your drive, they can right click the icon of the document in your shared folder and select "Make a copy." The document will then make a copy in their drive to edit. |
|
Ways in which you could use google drive with your students
* Create a public folder for your handouts and link it to your webpage or put it in Google Classroom
* Have students create a folder for a project and share it with each other. They can save all of the files into that one folder.
* Create a folder for your department and keep professional development materials or common assessments in there
* Basically, use it in place of your H-Drive.
* Have students create a folder for a project and share it with each other. They can save all of the files into that one folder.
* Create a folder for your department and keep professional development materials or common assessments in there
* Basically, use it in place of your H-Drive.
